In this article, we will learn how to setup a web application in Angular that has Firebase integration. This can be useful in a handful of ways including database and authentications.
Create Angular application
Firstly, create an Angular application if you don't have already. Make sure that Angular CLI is installed in your machine.
ng new demo-project
? Would you like to add Angular routing? Yes
? Which stylesheet format would you like to use? Less
After the installation, run npm start and navigate to http://localhost:4200 to see if it compiles successfully.
Install Firebase CLI
Next, if you haven't already, open up your terminal and run
npm i -g firebase-tools
This will install the Firebase CLI globally in your machine.
Make sure it is installed correctly by checking the version.
firebase --version
10.2.1
Login Firebase
The Firebase login process is relatively simple.
firebase login
It will open the default browser that allows you to select the Google account that you will be working with.
After that you should see the success message as below.
+ Success! Logged in as your-username@gmail.com
Creating a Firebase project
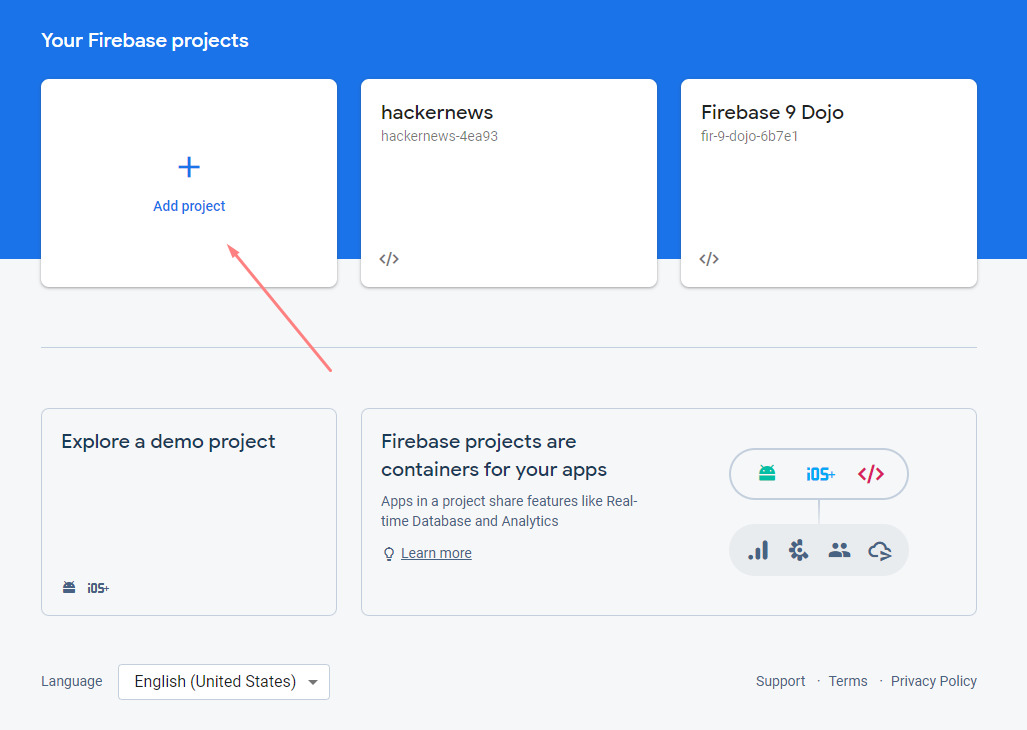
To create a Firebase project, navigate to Firebase Console and click on Add project.
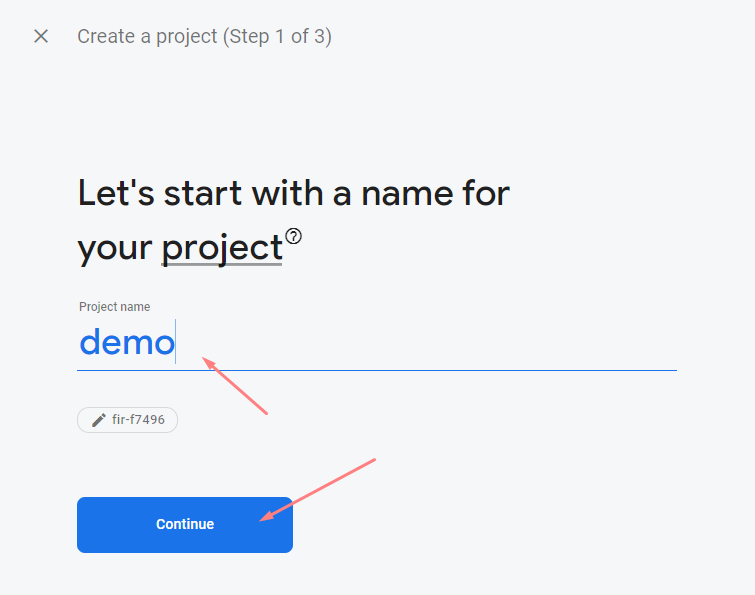
Give your project a name. In this case we will call it demo.
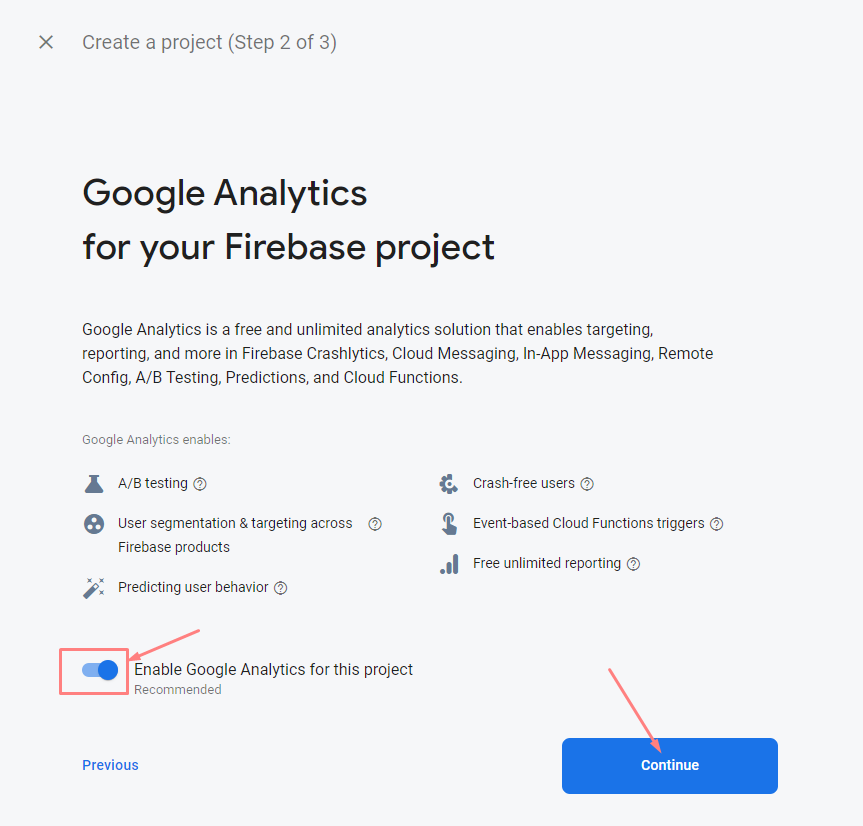
You can choose whether to enable Google Analytics for your project or not.
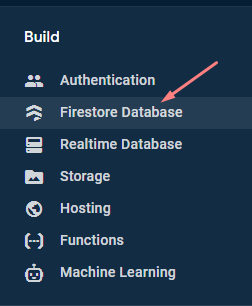
After the project has been created successfully, go to the Firestore Database and create a database there.
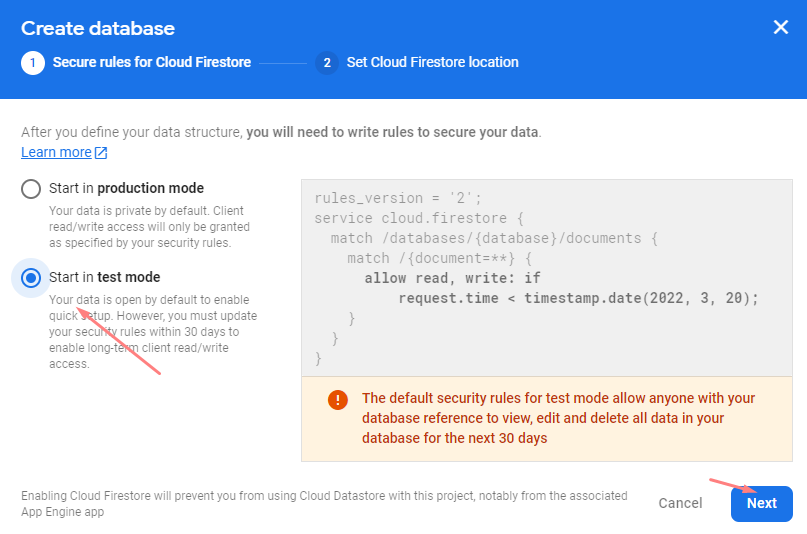
Select "start on test mode" and hit "next".
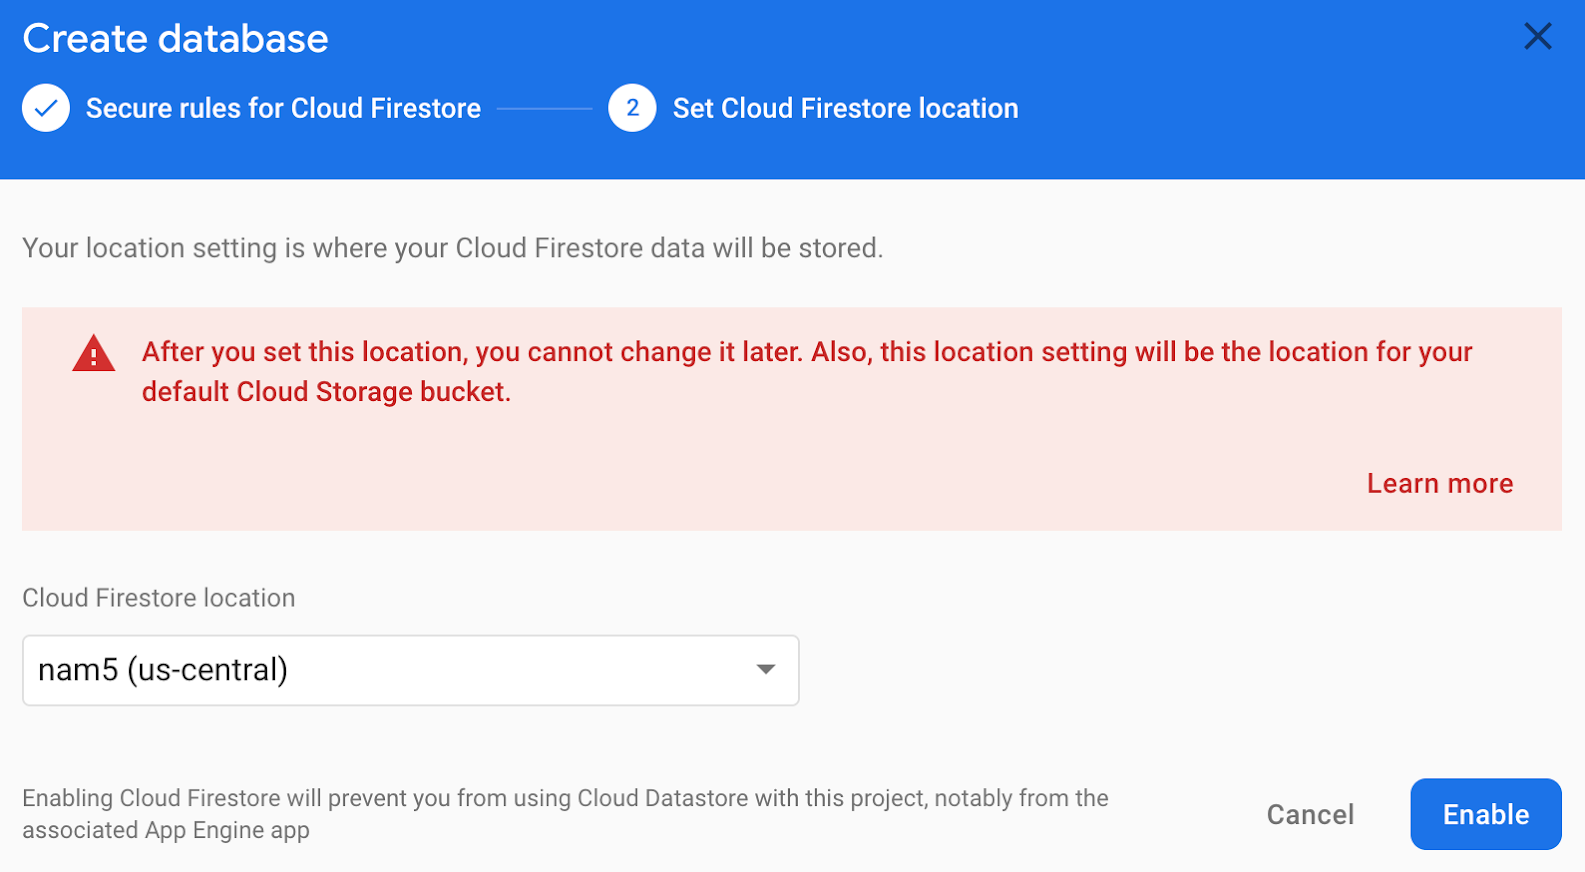
Select a region that better suits your geographical location. Sometimes Google will determine for you by autofilling the selection. Either way, proceed to click "Enable".
Creating a Firebase app
In the Firebase project homepage, click on the "Web App" icon to create an app for your Angular application.

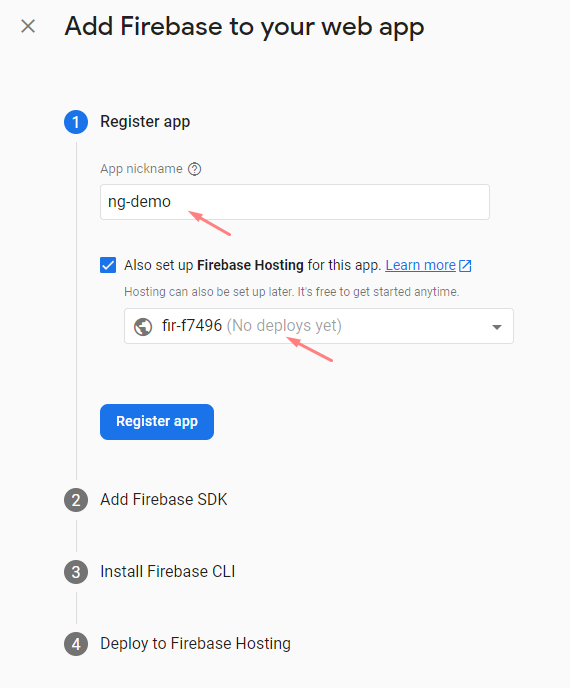
Insert the nickname for your app, and remember to tick Firebase Hosting and finally "Register app".
Install Firebase in Angular
We can install @angular/fire by using the ng add command.
ng add @angular/fire
It will prompt us for the other features that we want. Feel free to choose the features that you need. In this case, we will go for hosting, authentication, Firestore and Google Analytics.
? What features would you like to setup? (Press <space> to select, <a> to toggle all, <i> to invert selection)
>(*) ng deploy -- hosting
 (*) Authentication
 (*) Firestore
 ( ) Realtime Database
 (*) Analytics
 ( ) Cloud Functions (callable)
 ( ) Cloud Messaging
 ( ) Performance Monitoring
 ( ) Cloud Storage
 ( ) Remote Config
Next it will ask you for the Firebase project that you would like to associate it with this project. Go ahead and select demo that was created earlier in the Firebase Console page.
? Please select a project:
  [CREATE NEW PROJECT]
  Firebase 9 Dojo
> demo
  hackernews
After that, select a hosting site that has also been created earlier.
? Please select a hosting site: (Use arrow keys or type to search)
  [CREATE NEW SITE]
> https://fir-f7496.web.app
If you did not create an app in the Firebase Console for the Firebase project, you can select [CREATE NEW APP] and provide the app's nickname in the command line but if you already have an app created, it should appear as an selection in the prompt.
? Please select an app: [CREATE NEW APP]
? What would you like to call your app? ng-demo
After this, the Angular-Firebase package will created .firebaserc and firebase.json for us. It also help us to pull down the app credentials into environments.ts and environments.prod.ts inside the src/environments directory.
We can see something like this inside any of the environment.ts file
export const environment = {
  firebase: {
    projectId: '<your-project-id>',
    appId: '<your-app-id>',
    storageBucket: '<your-storage-bucket>',
    locationId: '<your-location-id>',
    apiKey: '<your-api-key>',
    authDomain: '<your-auth-domain>',
    messagingSenderId: '<your-messaging-sender-id>',
  },
  production: false,
}
Secret management
The problem with this approach is that this file is currently being tracked by Git and it is a bad idea if we continue to commit and push the file to remote. The credentials is at the risk of being compromised. Hence, we will need to use dotenv package to properly manage the credentials and .gitignore the environment folder. We also need yargs to pass command line argument to Node process that will bundle our codes.
npm i -D dotenv yargs
If the environment files is already being tracked by git, we can remove them from git without deleting the files by running git rm --cache -r src/environments command.
After that, add a .gitkeep file inside the environments folder. Proceed to commit the .gitkeep file with message such as Track environment folder as we want to let other collaborators know that the folder is still there but with different approach than the conventional ways.
Now proceed to commit the 'removed file' and add the environments folder to .gitignore
# Environments
/src/environments
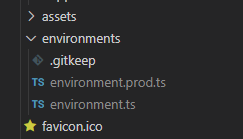
Now the environments file should be ignored as indicated by lightgray color inside VSCode.
Next, lets add a .env file at the root of the project. This file will contain all the sensitive information that we would not want to expose, including the firebase credentials that we obtained earlier. Add in the following contents with your Firebase project credentials, without any quotes surrounding the value.
FIREBASE_PROJECT_ID             =<your-id>
FIREBASE_PROJECT_APP_ID         =<your-proj-app-id>
FIREBASE_STORAGE_BUCKET         =<your-storage-bucket>
FIREBASE_LOCATION_ID            =<your-location-id>
FIREBASE_API_KEY                =<your-api-key>
FIREBASE_AUTH_DOMAIN            =<your-auth-domain>
FIREBASE_MESSAGING_SENDER_ID    =<your-message-sender-id>
FIREBASE_MEASUREMENT_ID         =<your-measurement-id>
It is strongly recommended to add an .env.example file with the exact same format with .env, but with empty or example (dummy) values after the = sign so that the other collaborators can setup the values with ease.
If havent done already, we will need to .gitignore the .env file as well.
# Environments
/src/environments
.env                <-- Add in this
For those who worked with dotenv package before, you might be tempted to add in
import dotenv from 'dotenv'
dotenv.config()
somewhere in the project, like main.ts or directly inside the environment.ts file and retrieve the set value with process.env.PROJECT_ID for instance.
Unfortunately, it will not compile and output the following error
Error: src/environments/environment.ts:5:13 - error TS2591: Cannot find name 'process'. Do you need to install type definitions for node? Try `npm i --save-dev @types/node` and then add 'node' to the types field in your tsconfig.
This is because the JavaScript code bundled and run on the browser does not have a context for process, which is server-side scoped by Node.js.
The workaround for this issue is to use a custom script. Create a scripts folder at the root of the project and create a file named setenv.js with the following contents:
const { writeFile } = require('fs')
const { argv } = require('yargs')

require('dotenv').config()

const environment = argv.environment
const isProduction = environment === 'prod'

const targetPath = isProduction
  ? `./src/environments/environment.prod.ts`
  : `./src/environments/environment.ts`

const environmentFileContent = `
export const environment = {
    firebase: {
        projectId: '${process.env.FIREBASE_PROJECT_ID}',
        appId: '${process.env.FIREBASE_PROJECT_APP_ID}',
        storageBucket: '${process.env.FIREBASE_STORAGE_BUCKET}',
        locationId: '${process.env.FIREBASE_LOCATION_ID}',
        apiKey: '${process.env.FIREBASE_API_KEY}',
        authDomain: '${process.env.FIREBASE_AUTH_DOMAIN}',
        messagingSenderId: '${process.env.FIREBASE_MESSAGING_SENDER_ID}',
        measurementId: '${process.env.FIREBASE_MEASUREMENT_ID}',
    },
    production: ${isProduction},
};
`

writeFile(targetPath, environmentFileContent, function (err) {
  if (err) {
    console.log(err)
  }

  console.log(`${targetPath} created with environment variables successfully`)
})
What this file does is to preload the environments variables in the .env file in the server-side and write the interpolated contents into environment.ts files that we've removed from git earlier on before bundling the client-side codes.
Next step is to invoke this file every time the project starts or builds. We can do that by modifying the scripts in package.json for start and build as follows:
// Excerpt ---
{
  "scripts": {
    "ng": "ng",
    "config": "node ./scripts/setenv.js",
    "start": "npm run config -- --environment=dev && ng serve",
    "build": "npm run config -- --environment=prod && ng build",
    "watch": "ng build --watch --configuration development",
    "test": "ng test"
  }
}
// Excerpt ---
That's it! Run npm start to see it in effect. It should compiles successfully without any issues.