Some disclaimers before we start, the approach that I am taking might not be the most suitable nor optimized there are still a lot for me to learn regarding this topic.
This are merely the steps that I've taken when dealing with testing with Nuxt. Below shows the steps for scaffolding the project.
Project setup
npx create-nuxt-app test-nuxt
create-nuxt-app v4.0.0
Generating Nuxt.js project in test-nuxt
- Project name: test-nuxt
- Programming language: Typescript
- Package manager: Yarn
- UI framework: Windi CSS
- Nuxt.js modules:
    (*) Axios - Promise based HTTP client
    (*) Progressive Web App (PWA)
    ( ) Content - Git-based headless CMS
- Linting tools:
    ( ) ESLint
    (*) Prettier
    ( ) Lint staged files
    ( ) StyleLint
    ( ) Commitlint
- Testing framework:
    ( ) None
    (*) Jest
    ( ) AVA
    ( ) WebdriverIO
    ( ) Nightwatch
- Rendering mode: Universal (SSR/SSG)
- Deployment target: Static (Static/Jamstack hosting)
- Development tools:
    ( ) jsconfig.json
    ( ) Semantic Pull Requests
    ( ) Dependabot
- Continuous integration: None
- Version control system: Git
Lets see the test files generated by create-nuxt-app. The code editors used is VSCode with Vetur extension installed.
Fixing Typescript test file
import { mount } from '@vue/test-utils'
import NuxtLogo from '@/components/NuxtLogo.vue'

describe('NuxtLogo', () => {
  test('is a Vue instance', () => {
    const wrapper = mount(NuxtLogo)
    expect(wrapper.vm).toBeTruthy()
  })
})
It is testing the NuxtLogo.vue component as scaffold by the create-nuxt-app. Nothing seems unusual here, just that the test file is in Javascript instead of Typescript. Lets fix that by renaming NuxtLogo.spec.js into NuxtLogo.spec.ts.
Now you will immediately notice some red squiggly line all over the editor.
import { mount } from '@vue/test-utils'
import NuxtLogo from '@/components/NuxtLogo.vue'
// error: Cannot find module '@/components/NuxtLogo.vue' or its corresponding type declaration

describe('NuxtLogo', () => {
  // error: Cannot find name describe, test and expect
  test('is a Vue instance', () => {
    const wrapper = mount(NuxtLogo)
    expect(wrapper.vm).toBeTruthy()
  })
})
Adding type declaration
First of all, we can resolve the imports error by creating a file called shims-ts.d.ts at the root of the project directory and paste in the declaration code as below:
declare module '*.vue' {
  import Vue from 'vue'
  export default Vue
}
Install Jest typings
The red squiggly line under the import should go away by now. Moving forward, install @types/jest as development dependency by running the follow command.
yarn add -D @types/jest
After it is being installed, open up tsconfig.json file and add the @types/jest into the types array.
{
  "types": ["@nuxt/types", "@nuxtjs/axios", "@types/node", "@types/jest"]
}

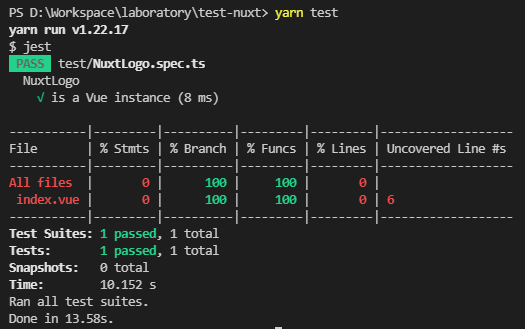
The test file are now able to compile correctly and the test should pass with test coverage as shown.
Testing Environment
Do note that we are using @vue/test-utils for testing the Vue component, which means that the Vue components is tested in a "browser environment". Nuxt has its own test utils called @nuxt/test-utils which can be found here.
Lets see how this caveat impacts our current way of writing tests. Lets create a component for a dummy popover button PopoverButton.vue under the components/ directory and paste the content as below.
<template>
  <div>
    <button @click="handleClick">Popover</button>
    <div v-show="isPopoverOpen">
      <a href="/">Link 1</a>
      <a href="/">Link 2</a>
      <a href="/">Link 3</a>
    </div>
  </div>
</template>

<script lang="ts">
import Vue from 'vue'

export default Vue.extend({
  name: 'PopoverButton',

  data: () => ({
    isPopoverOpen: false,
  }),

  created(): void {
    window.addEventListener('click', () => {
      this.isPopoverOpen = false
    })
  },

  destroyed(): void {
    window.removeEventListener('click', () => {})
  },

  methods: {
    handleClick(event: Event): void {
      this.isPopoverOpen = true

      event.stopPropagation()
    },
  },
})
</script>
The popover button implemented is just to show a hidden menu when clicked, and hide the menu when elsewhere is clicked. Nothing really special isn't it. I thought so as well.
Window API issues
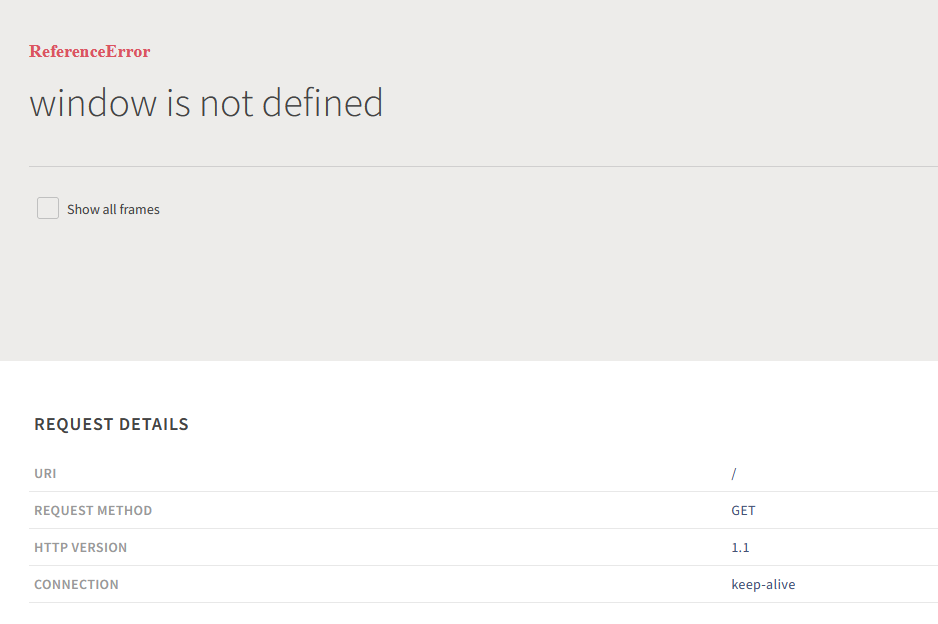
When we try to compile and run this in the browser, we were met with this screen instead.

Window? Undefined? What's going on here? Let me explain a bit. Although you are seeing this error through the browser, it is actually a Node.js runtime error as, remember, Nuxt.js components are server-side rendered first before sending it to the browser to perform client-side rendering.
Now if you take a look at your terminal, you should also get the same error shouting at you.

This is because the created hook runs both in the server-side and client-side. When the Node.js server is executing the codes, window object does not exist and hence the error.
Using process.client
To fix this, we add a if check to distinguish between the environments to selectively execute the codes and we can done that by using the process API as such:
created(): void {
  if(process.client) {
    window.addEventListener('click', () => {
      this.isPopoverOpen = false
    }
  }
}
This will fix the error that we faced earlier and hope that everything make sense up until now.
Process undefined issue
Now, when we try to write a simple test for the PopoverButton.vue component named PopoverButton.spec.ts in the test/ directory with the following content:
import { Wrapper, mount } from '@vue/test-utils'

import PopoverButton from '~/components/PopoverButton.vue'

describe('Popover button component', () => {
  //@ts-ignore

  let wrapper: Wrapper<PopoverButton>

  beforeAll(() => {
    jest.spyOn(window, 'addEventListener')
  })

  beforeEach(() => {
    wrapper = mount(PopoverButton)
  })

  it('calls addEventListener on mount', () => {
    expect(window.addEventListener).toHaveBeenCalled()
  })
})
The test that we added is just to check that whether window.addEventListener is called when the component is created.
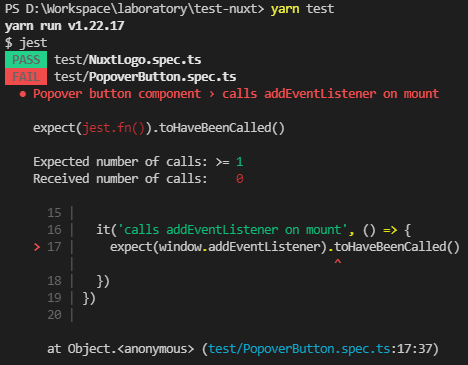
When we run the tests, you will notice that the test fails as such:

The add event listener function is not called.
Why is this happening? If we check the browser, the add event listener should be executed because the hiding and showing of the menu is working as expected.
This is due to the process object is not present in a browser environment and hence the whole if block is not called when the test is performed. The process object is only available in Node.js runtime but however Nuxt make it available for its server-side rendered application in the browser as well! Thats why it is working fine.
The thing is we are using @vue/test-utils instead of @nuxt/test-utils to perform the test and @vue/test-utils treats the component as the typical Vue components found inside a typical Vue-based project (that is not Nuxt).
Mocking process for browser
What do we do now, we are kinda falling into a dilemma that this is too much trouble test the application. Fret not, this is an issue that can be resolved with ease.
Add Jest setup file
Firstly, we need to let the test environment to aware that the process.client is available by creating a file called jest.setup.ts in the root directory. After that, we mock the object and property to true so that the if block leveraging this check will always pass and executes the code inside it.
process.client = true
We can mock or configure more global environments in this file if needed.
Register setup file
Subsequently, we will need to add this file for Jest to execute everytime the test runs inside jest.config.js configuration file by adding in the path to the file as an array of string with key called setupFiles.
module.exports = {
  // ... truncated
  testEnvironment: 'jsdom',
  setupFiles: ['<rootDir>/jest.setup.ts'],
}
Read more on Jest configuration file here.
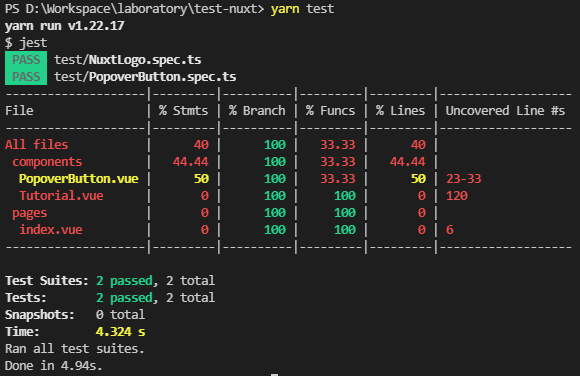
The test will pass if everything is done correctly.

Reasoning
I would recommend using @vue/test-utils only because
- It is installed by default when generating the boilerplate project.
- It offers much more API for us to use it is well-documented.
@nuxt/test-utilscan be seen as a complimentary package that is optional for us who does not intend to test any Nuxt-specific modules or features.
We then can install @nuxt/test-utils if we really want to test out the features offered by Nuxt.
Conclusion
At this point, most of the Vue components inside your Nuxt project can be tested with @vue/test-utils already. We have gone through how to add Typescript tests, add type declaration, fixing bugs and errors along the way and discussed about the test packages of Vue and Nuxt.
That wraps up the experience that I wanted to share regarding setting up the tests for my Nuxt project and hope it helps!